Tilt-Shift magic
I am sure you have seen or even created popular Miniature Effects with one or another creative filter. But there’s more!
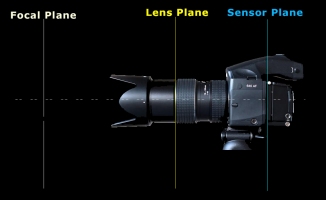
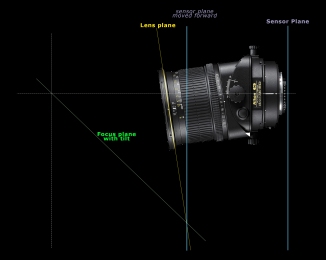
A Tilt-Shift (T/S) lens makes it possible to move the optical plane in relation to the sensor plane either with a Shift or Tilt position. Or even both at the same time. The effect created by the T/S adjustment offer a multitude of creative options to the savvy photographer.
The shift function allows you to correct the perspective, a handy method for merging pictures or getting tall buildings onto the sensor without having to step to far backwards.
With the tilt function, you decided exactly where focal plane is and where you want it.
With both together, you get a great deal of control over the image.
The Tilt Shift lenses is nothing new.
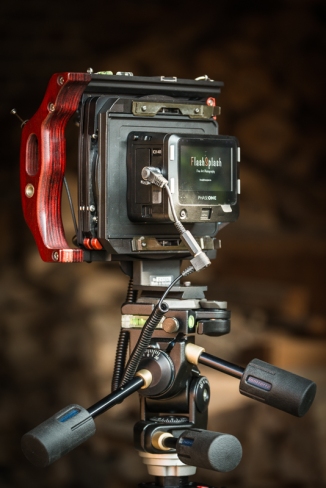
The first photographers learned the ins and outs of adjusting a lens relative to the light-sensitive plate. The classic folding camera with frosted glass and bellow remained for decades the ideal tool for the professional photographer. Even today, the monorail camera (also called technical camera), with its very agile lens plate and negative holder are a popular tool in studio’s especially when fitted with a medium format digital back (e.g. phase one).
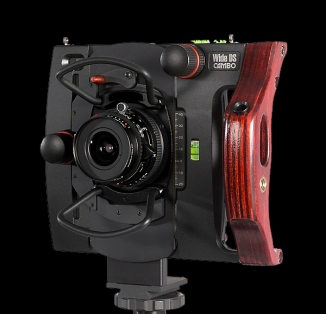 Technical cameras may indeed provide opportunities for optical corrections, however they are not handy for quick and / or working outdoors.
Optical misfits
Tilt-shift lenses differ in a number of ways from common lenses. Because they are intended for high quality and technically demanding shoots, hence great attention is given to the image quality with low distortion.
At the same time, their image circle – which is the circular projection of the subject on the surface of the sensor – is much larger than necessary in order to completely cover the sensor.
And as with any lens, the central portion of the lens has the best optical parameters. Yet, towards the edge of the circle image the resolution decreases rapidly. A T/S lens has image sharpness down to the edge , but then deteriorates immediately.
Shooting with a Tilt Shift Lens requires careful work.
Shooting with a Tilt-Shift lens requires some skills and experience. Dealing with the “Shift effect” is rather straight forward and easy. However the Tilt function is more demanding. It certainly takes some time before you can quickly assess the impact of the different settings and adjustments.
Using a T/S lens with a DSLR , will force you to operate in the manual mode for focus, exposure and white balance . Those need to be set while the T/S lens is at 0 Tilt and 0 Shift position also called the neutral position. After all the adjustments of the lens may confuse the various separate measurement systems.
Live View mode can be an option for fine-tuning, especially when combined with focusing aids or a tilting screen.
Always mount the camera with the T/S lens on a solid tripod with a good tripod head.
 Check that the camera platform is level. Use a remote control or timer (timer function) to avoid vibrations.
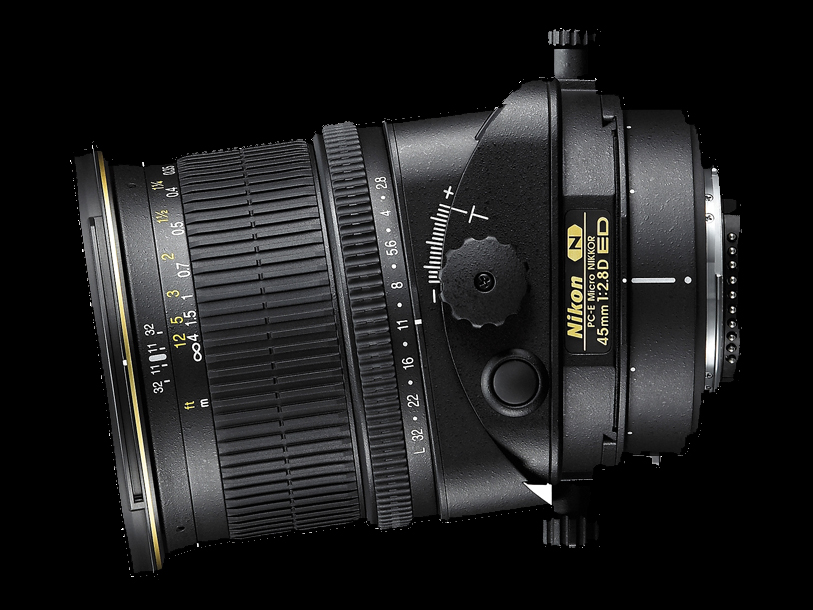
The setting range for tilt-shift lenses on a full-frame DSLRs is usually 10 to 12 mm shift and 6 to 8 ° of tilt. Every movement is controlled separately via a rotary knob with a scale; the setting is locked with a second button. More recent models allow for angles between 0 ° and 90 °. Furthermore the T/S lens can rotate as whole to the camera mount, so you can precisely set the direction of the adjustments.
Which lens for what ?
Tilt-shift lenses can be used in different types of photography. The big two – Canon and Nikon – offer a range of models with different focal lengths. Architectural, interior and landscape photographers usually choose the most popular 24mm version or the more extreme 17mm version.
T/S lenses with focal lengths of 45, 85 or 90 mm are more commonly used in product shoots, still life, food photography, jewelry, close-ups and creative portraits.
However the majority is designed to be mounted on a full frame DSLR. But even then they may not fit every FF camera body. So, always check the compatibility between a T/S lens and your camera body.
Perspective Correction without difficulty
Photos captured by a standard 24mm wide-angle lens and a 24mm tilt-shift lens in the neutral position are identical in image content. However the image circle of the tilt-shift lens is much larger, and covers approximately the same field of view as a normal 16mm lens.
Shift function
The shift function moves the image circle of the lens with respect to the sensor of camera. The effect is similar to a variable cut (crop) of an image created by the use of a lens with a shorter focal length – the big difference here is that with a T/S lens the image falls on the sensor. The most important application of the shift function is the correction of perspective distortion. Parallel lines in the subject are only displayed parallel in the image as the face of the subject and the image plane (sensor) is exactly parallel.
Parallelism of a standard lens
When tilting the camera upwards when photographing a tall building to get everything into the picture, the trapezoid lines will walk towards each other. To display the vertical lines of the building correctly parallel, the sensor shall be perfectly parallel with the building. A tilt-shift lens lets the camera be level so that the vertical lines will remain parallel. Hence, the top of a tall building will be within view while on the other hand some foreground aspects (non-interest) will be missing.
Shifting Up or Down the Shift function of the T/S Lens will bring the building fully into the picture – of course ,as long as the viewing angle of the lens allows.
You can apply the same principle to hold parallel lines running down from a high angle, or to correct horizontal fleeing lines. The latter is done with a horizontal lens shift. (Remember that many of the newer lenses can rotate)
Note, that a perfectly corrected perspective can look unnatural: admit a little bias often gives a more realistic picture.
Can post-processing software do this?
Virtually every software package for post-processing makes it possible to correct the perspective afterwards. Specialized tools can deliver more than decent results.
So why should anyone go and buy those expensive tilt-shift lenses?
An important difference is that during the post processing parts of the original picture will be lost or be outside the frame. Of course one could focus wider during the shoot to compensate… but guess what? You will lose megapixels, and maybe get a less interesting composition.
Secondly the post processing correction needs to create new intermediate pixel values, whereby resolution and sharpness is lost.
 And perhaps most importantly, the correction is not proportional in horizontal and vertical direction. Resulting in deformed proportions within the image. It can usually be adjust manually (for example, by stretching the image vertically) but in the absence of any reference that might be not all that accurate.
Correct proportions are very important when photographing buildings, interiors, furniture or other products that must have a realistic perspective. Working with a tilt-shift lens guarantees predictable result without time-consuming post-processing and guesswork.
Avoiding Obstacles
Sometimes obstacles can hinder a clear view on a subject. Two options are available, move the camera to a better position if possible, or simply use the shift function of the T/S lens to create that clear view and avoiding the obstacle, while maintaining the essence of the composition. Or visa versa by bringing in an object that is just out of the picture.
In other situations, the shift function helps to eliminate reflections on reflective surfaces.
Tilt Function
Creative with sharpness
A tilt-shift lens makes it possible to move the optical plane relative to the image sensor (Tilt). This brings a unique and very powerful feature: it allows the focus plane to be placed as such that it coincides with a well-chosen part of the subject. This “selective focus” opens up many creative possibilities.
Tilt principle
Normally, the focus plane is perpendicular to the axis of the lens, therefore, parallel to the sensor. Depending on aperture, focal length and focus distance, all objects within a certain area just in front of and behind that area are in focus: Depth of Field (DoF). Reducing the aperture (larger F number) enlarges the DoF ,but that ultimately causes loss of sharpness by diffraction effects at high F numbers. Secondly the sharpness area may possibly not coincide with that part of the (three-dimensional) subject that you want to emphasize.
Tilt movements allow for a tilt so far that the sharpness level is no longer parallel to the sensor, but precisely coinciding with a specific area of the subject. All objects in this area will be in focus, even though they are at different distances from the camera.
Tilting causes a depth of field that is no longer a zone which runs parallel to the focus plane, but a wedge-shaped area that ends wider as the distance increases.
The aperture determines how wide the DoF wedge extends. A greater tilt angle and a larger aperture number narrow the selective focus zone.
Miniature Effect
If the tilt function is deliberately applied in the reverse direction, it will cause only a small part of the subject to be within the wedge-shaped edge area (sharpness zone) . The result is the well-known ‘fake miniature effect’ .
The tilt effect applied
For landscape photography the tilt effect can bring both the foreground (e.g. a lake) and the background (e.g. a mountain range) in focus , without having to use a very small aperture (high f number). A small inclination angle is often sufficient for this.
In architecture or urban photography a wall or barrier can be kept in selective focus.

Shift effect of TS Lens
Typical examples can be found in food photography, product images (emphasize one side of the device), close-ups and macro shots (coins or jewelry) …
Remember that after tilting the lens it may be necessary to slightly adjust the framing.
Tilt effects can not be created in post processing software; sure un-sharp area’s can be created from sharp originals, but un-sharp originals can not be made sharp !. The tilt effect of a lens has a 3-D effect on the sharpness zone, post processing is 2-D , hence don’t believe that you can apply tilt effects in Post –processing unless it’s black magic.
The strength of a tilt-shift lens is when both adjustments are combined. It is very important that they can be set independently of each other and in the desired direction. For example, landscapes use both movements most often in the vertical direction. In architectural and product photography, the adjustments are more perpendicular.
Thanks for reading.

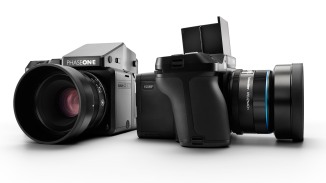
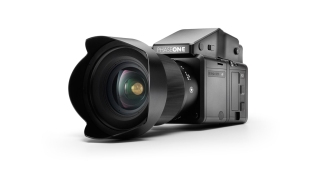 Recently Phase One released a brand new Phase One Camera, the XF. It replaces the DF-645 and DF-645 + , which were actually Mamiya camera’s. The XF is engineered and build from the ground up and has many features, but most of all a newly developed focusing system based on a 1Mpixel focus sensor (Honeybee) .
 I can’t say that I agree with the critics, as I have been using the new XF and before the 645df+ body. Both have a single focus point, located in the center of the lens. So, allow me to put down some words in defense of Phase One.
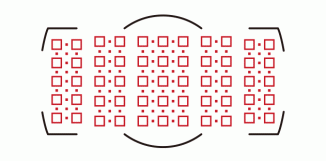 Those DSLR’s with multiple selectable focus points (Nikon, Canon etc…) use only a part of the focus sensor. The focus sensor is partitioned and each partition matches to the selected focus area on the viewfinder. Hence only a sub set of the pixels (focus sensor) are used to track and hunt the focus.
 The bottom line is, the Phase One XF central single focus point uses the full focusing sensor resulting in accurate and very fine adjustments , combined with the best optical performance of the lens ( center).